Working with the radius on fingerboards by hand is very tire-some and time-consuming process. And it’s usually in those moments that you wish to have a better way of working.
In this case I wanted a tool that could support any radius sizes but also that you can do compound radius. I figured that I’m probably not the first person with these thoughts so after strolling the web for solutions and inspiration I found some interesting examples to elaborate from. So, a month ago I finished the jig and did a blog post(only in Swedish) about the work.
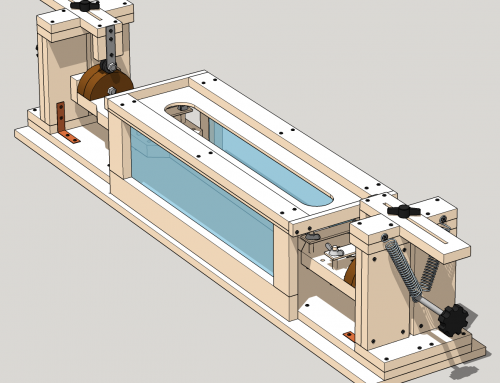
And here’s my version and plan of the Fingerboard radius jig.
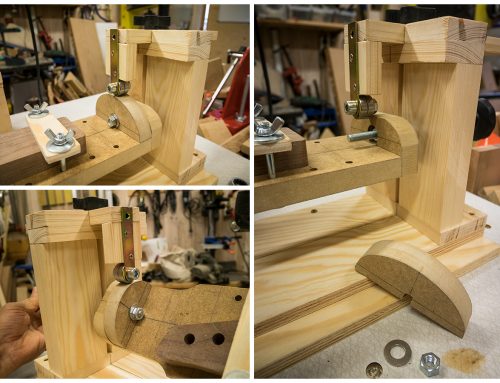
This model supports settings for both 1 and 2-radius fingerboards (Compound radius Fingerboards). In this model you can get 7.25″ up to approximately 18″. If you want values above, you’ve to add 15-25 cm to the height of the frames. One other thing that isn’t present in the plans is that I’ve mounted 2 small springs between the outer frame to inner frame. You can see parts of them in the last picture of the finished jig by clicking on it. The reason for this feature is to protect the frame to not fall down sideways and at the same time make jig more stable.
Download PDF file: Fingerboard Radius Jig Plan
For better resoultion: Save the PDF-file to the desktop and open it with Adobe Acrobat Reader!
Get Adobe Acrobat Reader here!
Download Google Sketchup file (*.skp): Fingerboard Radius Jig Plan
Get the Google Sketchup viewer here!
Hope this plan will help or inspire you to do faster and better fingerboards.




What is the “Frame angle adjustyer” for?
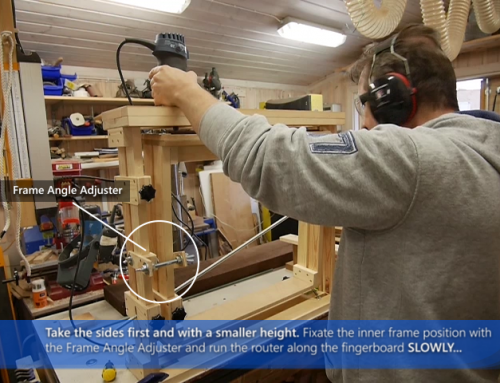
It fixate the position of the inner frame so it does’nt move when your drive the router along the fingerboard.
After 1-2 runs you can change the position of the inner frame gradualy, from the center to the ends. Inspect the result after each run and be carefull to not take out to much wood. To get the best result; Work in small steps towards each fingerboard sides.
Thank you for the answer Michael! It’s a great jig! Best regards.
Great plan! Many thanks! Just 2 questions:
-What is the purpose of the two upward height adjuster? Just to retain the jig when not using it?
-The big M6 knob, are those just screwed direct in the wood or do you use some kind of nut and bolt to be sure they do not move when working?
Thanks Vincent! 🙂
Reg. the height adjusters… Their purpose is actually only for getting a good setup.
Because when you adjust the inner frame to different radius it’s hard to see if the heights are the same at each ends of the fingerboard. As soon you’re satisfied with the radius settings and that the height is equal between fingerboard and router. You can remove them (Height adjusters + rod).
Reg. M6 Knob… I used threaded inserts on the wood to clamp the frame.
Hope the answers work! 😉 Otherwise I’ll try again. 🙂
Thanks a lot! I just now have to mod a little the spec to fit with 19mm (3/4″) North American plywood/mdf found in Canada and adjust for be able to carve bass fretboard! Thanks a lot!
NICE WORK
Thanks! 🙂
It’s very nice. I like that it does compound and infinitely variable radii. I made the “other” one that is floating around the internet with a router sled that slides along the top of the jig while the inner frame “pendulum” rocks side to side. I modified it so that I turn a crank which rocks the pendulum side to side and drives the router sled down down the top using a threaded rod.
Thanks! 🙂
Do you have a video of this in action? Would love to see it before embarking on building it for myself! Also – thanks for making the plans free!
Hi alingham! Yes, I will do a shorter film next time I do fingerboards.
BR/
Michael
Hi Alingham! Here’s the video… http://www.kappi.com/blog/2018/04/fingerboard-radius-jig-in-action/
BR/ Michael
Hi Michael,
thanks for the plan! It’s great!
A question is left with me: why does one have to fix the inner frame with the frame angle adjuster and to run the router parallel to the fretboard? Is it possible also to rock the inner frame constantly and moving the router bit by bit along the fretboard?
Thanks a lot!
Hi Fritz! Thanks! 🙂
Reg. the question; You can rock the inner frame by hand if you’re careful. But… It’s more wood to go through with the risks of getting unintended router runs and splintered edges. Also, there’s a risk that the fretboard can move from the fixed position if the router gets a hold on the wood.
I found that it’s safer to take smaller runs along the fretboard and the frame angle adjuster helps to get that temporary lock. (I’m also using a fixed height on my router).
BR
/Michael
And here’s the video: https://www.kappi.com/blog/2018/04/fingerboard-radius-jig-in-action/
I know this is a bit old, but do you have the height measurements to put the blocks at for each radius?
Hi Daniel!
Did a quick measurement for each radius intersections (Measured from inner frame bottom to the radius intersection);
7.25″ = 350 mm
9.5″ = 293 mm
10″ = 280 mm
12″ = 230 mm
14″ = 178 mm
16″ = 127 mm
Cheers!
Michael
… understood! Thank you. I will build one 🙂
KR
Fritz
Fritz! Saw afterward that I had accidentally set a “question mark” after “thanks” on my reply.
Sorry about that! Have changed it now with a smile-emoji as it was supposed to be. Happens when I’m too quick on replying without checking…
Hi Michael,
Thanks once more for sharing your experience and tool inventions with us!
A very basic question from a newby: Why would I want different radii on head and body end? I checked my industrial built mid class guitars and they all have the same radius from top to botton. I guess this is meant for maintaining the string clearance of the outer strings (E-e) over the growing width of the fretboard?
BR
Sönke
Hi Sönke!
Yes, using compound radius such as 10 at the neck sadle and 16 at the bridge gives you less string height differences on the high and low E’s. It makes it easier to play on the higher parts of the fingerboard. But it depends on what bridge/tremolo you’re using. It’s useful if you have an bridge that’s adjustable for separate string heights. Is it a “fixed” radius on the bridge, then a compound radius fingerboard doesn’t give you any advantages.
BR/
Michael
Hi Michael,
I’m a lucky guy considering the speed of your feedback. Many thanks!
I have it all in my hands as I’ll even make the bridge by myself. The project target is an electric guitar with a wider neck (48mm) that better suits my play. Beside my childhood desire to become a luthier myself and working towards it over decades of home carpenting and smithing this was key for my decision to build my custom guitar, now. For my 1st instrument I’ll go for a Strat copy in all the other aspects. I guess the 1st built in general and the change of the neck width is sufficiently challenging. I even have to make the Pickups by myself…
However, I admit I can’t follow the logic of your kind advice. Actually, I’d expect the opposite: With a fixed bridge radius I could “move” the fretboard closer to the strings by “flattening out” the neck radius towards its bridge end but with a stringwise hight adjustable bridge I can easily approach the strings to the fretboard, right?
I’m really keen to fully understand this point as the levelling/sanding of a compund radius is surely way more delicate than a constant radius because I couldn’t use a fixed radius sanding block. I surely want the best guitar I can shape out of the precious wood but I also better avoid over-engineering my 1st luthier project.
BR
Sönke
This jig is the best I’ve seen. I’m planing to put it together. Thanks for your generosity in sharing it!
Thanks, Ivan! 🙂
Let me say this is a great plan. I’m converting everything from Metric to Imperial since US doesn’t teach us enough to really be comfortable with Metric. It took me quite a few looks before I saw the springs that were mentioned. (1 pair down by the 90 angle pieces, on the last pic. for those reading.) Anyway, I was wondering if I can build 1 machine to handle guitar and bass. I guess what I’m asking is, does it matter, or does the length of a bass affect the angle so much that 1 or the other wouldn’t be accurate on the same machine? Thanks so much for this plan.
Really nice,I accidentally found this stuff.Carving jig works great.Thanks.
Hi Reini!
Thanks! 🙂
Really Nice!
What adjustments would be required to make bass fretboards?
You only need to increase the lenght of the routerboards, Pretty much. And of course change the puck profiles.